Spring Garden Soil Preparation


Preparing Your Backyard Garden for Spring Planting
It's the most wonderful time of the year - time to prep your garden for a great growing season. Let's go on a step-by-step journey of how our family gets ready to plant the vegetable garden, what we do to prep the soil, how we plan what to grow, and the timing of all those elements. Grab your garden gloves, tools and let's go!
Step 1 - Remove Remnants of Old Crops
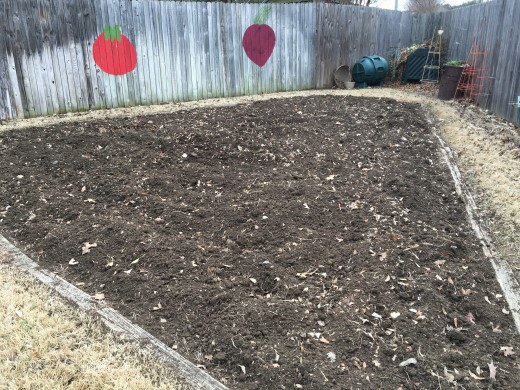
Since your last harvest, your garden surface has sat through probable rain, snow, sleet and hail. Along with cold, fog, wind, and hopefully some sunshine. It has weeds in it, maybe some old crops you didn't ever pull up before the first frost hit, and the surface is lumpy (as noted in the picture). Let's start by clearing off the large stalks left from old tomato plants, mustard greens, okra stalks, and maybe even corn to create good, rich soil for your new plantings.
Do not throw these away as they make excellent material to shred and add to your compost pile.
When working the soil, try to stay off the soil as much as possible so you don't compress it; you want it as light and airy as possible. As a general rule we try to walk around our garden border to work but this is not always possible.
Step 2 - Turn the Soil By Hand
Our garden is framed by landscape timbers. We have St. Augustine grass that has runners that spread and grow. Unfortunately these runners jump the frame of our garden and creep in so at the beginning of growing season we have to rid them from the soil for a better composition of our dirt all growing season. We even pull some of them by hand to insure removal of grass and weed fragments.
I have to state here that my friend Allen helps me with my garden or I could not do all this by myself! He turned the whole 320 square foot garden by hand over the course of two days with a pitchfork.

Step 3 - Add Compost
We have a compost corner in our garden with several stages of compost working in each bin. This year we had the best compost we've ever had! What a treat it was to see that rich, black soil coming out of the bottom of our compost bins.
We like to add some of the compost to the second till to be worked in and then we use the remainder to either plant our crops with, or cover the seeds when planted - right on top of the seeds. The compost placed on top is quickly soaked into the garden upon the first watering. Think of all those organic nutrients heading down to join those new roots!
Step 4 - Till The Soil
If you don't have any winter crops growing, you are ready to till. Before you use the tiller, make sure it has the proper oil in it and you have gas that is not stale from sitting in a shed or garage all winter.
On the first pass, till all available space walking behind the tiller with some good boots or old tennis shoes on. Garden clogs on your feet are not advised here since you are running a machine.
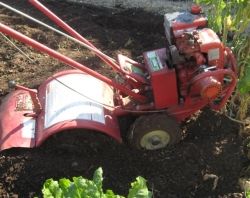
Rototiller - Troy Bilt Models
We have had a Troy Bilt tiller for over 20 years. It is an essential tool for prepping your garden soil. They are available in varying sizes and power.
Step 5 - Till The Soil Again
After the first tilling, remove any large rocks you may have found, any large strings of grass, weeds or even trash. You are ready for the second pass. This time, as you till, try to walk in the space you are headed to next so you don't step on the newly tilled soil. This is challenging, but doable. If your soil is not smooth and clump-free, you may need a third pass at tilling. Established gardens with good soil usually need one or two passes.
Also, we like to leave a little ridge on the inside edge of the landscape timbers so the surrounding grass has less chance of creeping into the garden.
If you are new to gardening, the tilling process may require 3-4 passes, be patient, this will pay off when you see those first shoots coming out of the ground!
After tilling, even out the entire garden surface with a rake.
Garden Hoe
You'll need a hoe
to make good rows
before you go
to the last step of this show.
Step 6 - Ready to Plant!
When it comes to planting you should research what growing zone you live in and the type of seed varieties that do well in your zone. Check out the USDA version of the hardiness zone map to learn what zone you live in. Be aware that local home improvement stores don't always have the correct varieties of seedlings for your area. Try buying from a known local grower or farmer's market. The best thing you can do is be an informed buyer when it comes to seedlings.
Harvest Your Own Seeds
One method we have taken to is harvesting our own seeds from the previous years plants. Here is an example of how we harvested spinach seeds. Spinach does not grow well here when it gets warm or hot. Since the spinach was situated in an area of the garden that we did not need to remove it when it was finished producing (alongside other greens still growing - like swiss chard), we let it "go to seed". To do this you just let it flower and after flowering, it will produce seeds. When you are sure they are dry enough, gently pick the seeds (for spinach they are small and black) and drop them right off the plant into an envelope or container. When we planted spinach a few weeks ago, you guessed it! We used our own harvested seeds. This process is called seed saving.
Storing Your Seeds
The way you store your seeds from season to season is very important. They should be in a dry, cool place. We store ours in the freezer and have had great results with seeds several years old. Last year I used radish seeds from 2008 and they produced delicious results! Of course this doesn't always work, which is why you should have a back up seed packet ready.
Buying Your Seeds Early
Seed catalogs start arriving right after Christmas, and there's a reason why! The early bird gets the worm! Specialty varieties can run out if you don't order early and most of the time this means two weeks before you want to plant, but it doesn't hurt to plan ahead to get the seed variety you really want.
In almost every garden, the land is made better
and so is the gardener.
Robert Rodale
Where Do You Stand In The World of Gardening?
Where Do You Stand In The World Of Gardening?
Did You Know...
...that one teaspoon of healthy garden soil has over
4 billion micro organisms in it?
Nature's Helpers - Worms
Earthworms break down organic matter in soil and leave behind castings which is a type of fertilizer that is essential to good compost or soil composition. If you have worms in your garden, keep them right there! It is a sign that you have good, fertile soil.
This content reflects the personal opinions of the author. It is accurate and true to the best of the author’s knowledge and should not be substituted for impartial fact or advice in legal, political, or personal matters.
© 2013 Joanie Ruppel


